Real-time notifications with Django-channels, HTMX and Server Sent Events
Table of Contents
When using HTMX with Django, you may have come across the problem of updating HTML components in real-time based on changes that happen to the underlying data in the database.
The simplest way to make real-time updates to html elements is for the client to regularly poll the backend for updates. HTMX makes this easy with polling. However, there are two issues with this:
- It’s not really “real-time”. You are polling the backend at a regular interval, but the data could have changed at any time in the interval.
- It is inefficient and does not scale. Imagine you have 20 distinct components on a page which need to be updated in real-time. So you add
hx-trigger="every 2s"to each one of those components. Now imagine you get 100,000 visitors to your webpage at the same time. In just 30s, you’re going to get 30M requests to your backend. This is a sure-fire way to DDoS yourself.
What if you abandoned the traditional request-response model that Django expects? Modern web-applications support bi-directional (full-duplex) communications initiated by either the client or server through a variety of methods:
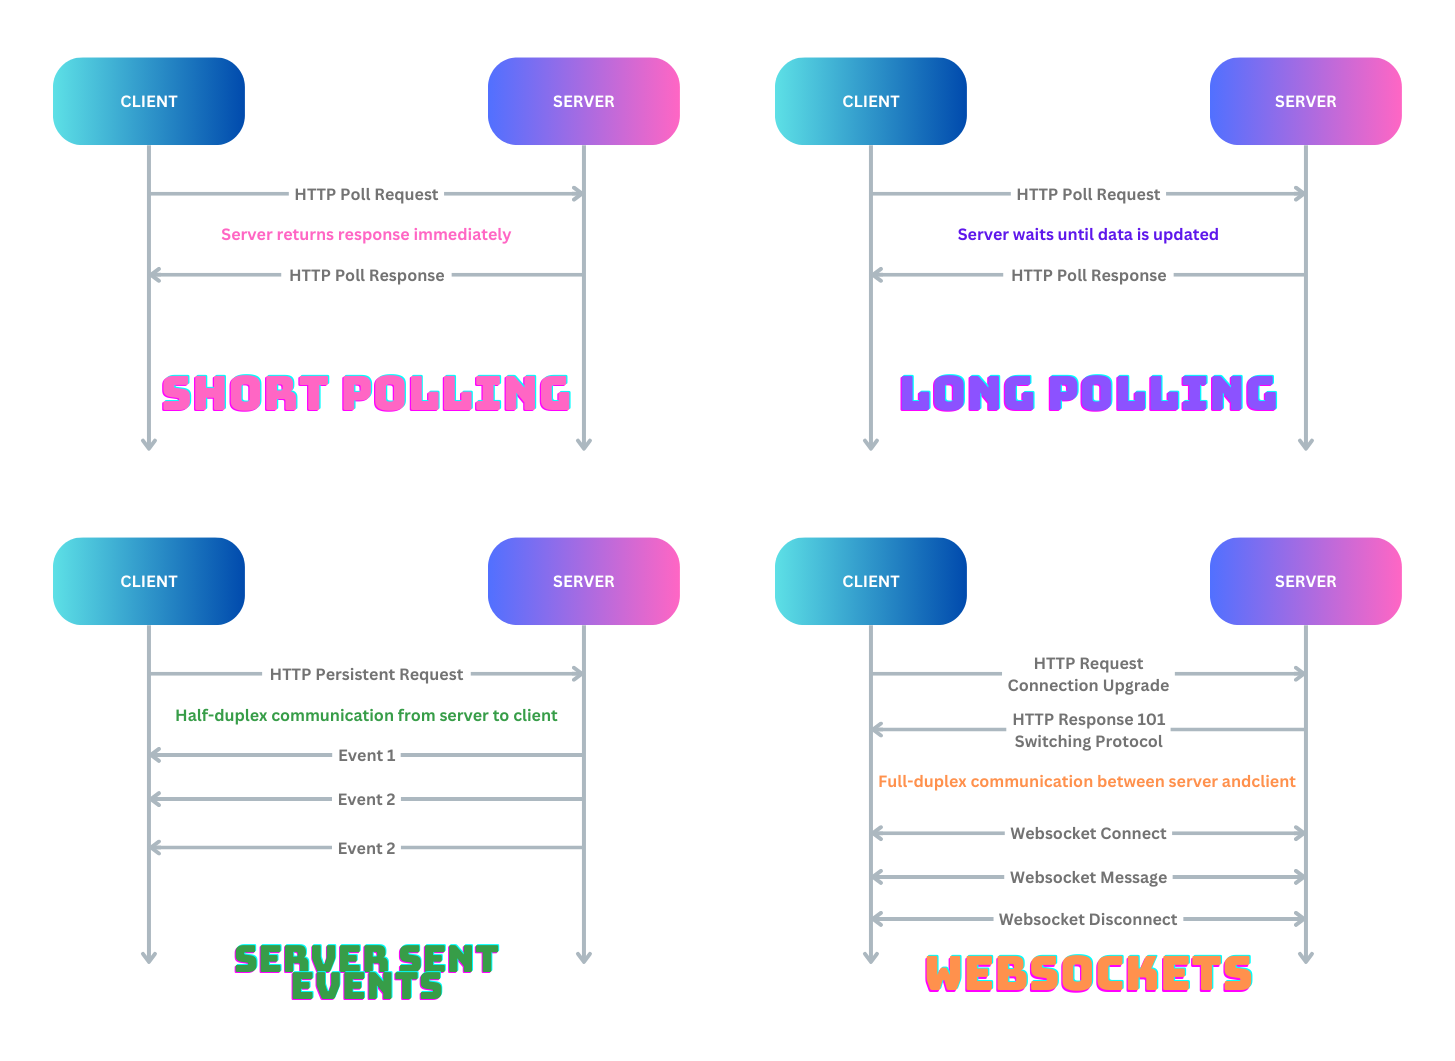
So which one should we choose? Here is a very unauthoritative guide to select the right one:
| Short Polling | Long Polling | SSE | Websockets | |
|---|---|---|---|---|
| Number of users | Small | Small | Large | Large |
| Number of updates | Low | Low | High | High |
| Frequency of updates | Low | High | High | High |
| Direction of data flow | Server -> Client | Server -> Client | Server -> Client | Server <-> Client |
For our use-case, SSE does the job. It uses a single persistent connection to allow the server to notify the client (browser) when changes in the backend occur. For the same scenario described previously, you’ll only have 100,000 requests to your backend over 30s instead of 30M.
We’re going to setup a Django app which allows users to create tasks and assign them to users. Assigned users will receive notification events in real-time via SSE when this happens.
0. Setup: Django App
Let’s setup the django app for our example. Feel free to skip to the next section if you just want to get to the good stuff, and grab the code from here to follow along.
-
Create a new project and app:
django-admin start-project sse cd events django-admin-start-app events cd .. -
Create a dependencies file and install it:
We’re going to use poetry to manage our dependencies, so make sure it’s installed with
pip install poetryThen create a
pyproject.tomlfile in the root directory with the following contents describing our dependencies:[tool.poetry] name = "sse" version = "0.1.0" description = "" authors = ["Moebius <moebius@moebius.space>"] readme = "README.md" [tool.poetry.dependencies] python = "^3.10" Django = "^4.2" channels = "^4.1.0" uvicorn = "^0.29.0" channels-redis = "^4.2.0" [build-system] requires = ["poetry-core"] build-backend = "poetry.core.masonry.api"And finally, install dependencies with
poetry install -
Create a simple model for our tasks in
sse/events/models.py:from django.db import models from django.contrib.auth.models import User class Task(models.Model): title = models.CharField(max_length=100) description = models.TextField() due_by = models.DateTimeField() created_by = models.ForeignKey( User, on_delete=models.CASCADE, related_name="created_by_user" ) assigned_to = models.ForeignKey( User, null=True, on_delete=models.SET_NULL, related_name="assigned_to_user" )and register it in
sse/admin.pyso we can create tasks using the admin console:from django.contrib import admin from sse.events.models import Task # Register your models here. admin.site.register(Task) -
Create a basic template for our home page, which contains:
- A grid display of existing tasks which will be updated when new tasks are created in the backend
- A hidden toast message which displays the latest notification details when it arrives
Create the template file:
sse/events/templates/home.htmlwith the following contents:<!DOCTYPE html> <html lang="en"> <head> <meta charset="UTF-8"> <meta name="viewport" content="width=device-width, initial-scale=1.0"> <title>SSE Events Example App</title> <script src="https://cdn.tailwindcss.com"></script> <script src="https://unpkg.com/htmx.org@1.9.12" integrity="sha384-ujb1lZYygJmzgSwoxRggbCHcjc0rB2XoQrxeTUQyRjrOnlCoYta87iKBWq3EsdM2" crossorigin="anonymous"></script> <script src="https://unpkg.com/htmx.org@1.9.12/dist/ext/sse.js"></script> </head> <body> <nav class="m-0 p-4 overflow-hidden bg-gray-800"> <li class="inline"> <a class="text-gray-200" href="/">Home</a> </li> </nav> <h1 class="m-4 text-bold text-lg">Tasks</h1> <section hx-ext="sse" sse-connect="/sse/notifications"> <!--This is where we will display our tasks--> <div sse-swap="task_event" hx-swap="innerHTML" class="grid grid-cols-1 md:grid-cols-4 m-4 p-4 gap-2 text-wrap"> {% for task in tasks %} {% with task as task %} {% include 'task.html' %} {% endwith %} {% endfor %} </div> <div sse-swap="notification_event" hx-swap="innerHTML" id="notification" class="hidden fixed m-4 min-w-64 ms-32 bg-gray-200 text-gray-800 text-center rounded-sm p-4 z-1 bottom-0 right-0 text-wrap"> </div> </section> </body> </html>We’re going to be adding dependencies directly via CDN rather than setting up a dependency management pipeline to save time. Of course you wouldn’t do that in production.
Individual tasks are going to be rendered from a separate partial template file
sse/events/templates/task.html:<div class="block max-w-sm rounded-lg border border-gray-200 bg-white p-6 shadow dark:border-gray-700 dark:bg-gray-800 dark:hover:bg-gray-700"> <h5 class="mb-2 text-2xl font-bold tracking-tight text-gray-900 dark:text-white">{{ task.title }}</h5> <ul class="font-normal text-gray-700 dark:text-gray-400"> <li class="pb-2 font-bold text-blue-800">@{{ task.assigned_user.username }} <span class="text-black font-normal"> by </span><span class="text-red-800">{{ task.due_by }}</span> </li> <li class="py-2">{{ task.description }}</li> <li class="py-2">from <span class="text-green-800">@{{ task.created_by }}<span></li> </ul> </div> -
Create the view file
sse/events/views.py:from django.template.response import TemplateResponse from sse.events.models import Task def home(request, *args, **kwargs): return TemplateResponse(request, "home.html", {"tasks": Task.objects.all()}) -
Create the url file
sse/urls.py:from django.contrib import admin from django.urls import path from sse.events.views import home urlpatterns = [ path("admin/", admin.site.urls), path("", home), ] -
Finally, we’re going to create a Dockerfile to package our app and run it using Docker Compose (this will make it easier to make the necessary changes in later steps)
First create the
Dockerfilein the root directory:FROM python:3.11 ARG USER ARG GROUP WORKDIR /app COPY --chown=${USER}:${GROUP} pyproject.toml README.md manage.py /app/ ENV PATH="${PATH}:~/.local/bin" RUN pip install poetry && python -m poetry install COPY --chown=${USER}:${GROUP} . /app CMD poetry run python manage.py runserverAnd a docker compose file to deploy it
compose.yaml:services: web: build: . ports: - "8000:8000"And now you’re finally ready to run your app with:
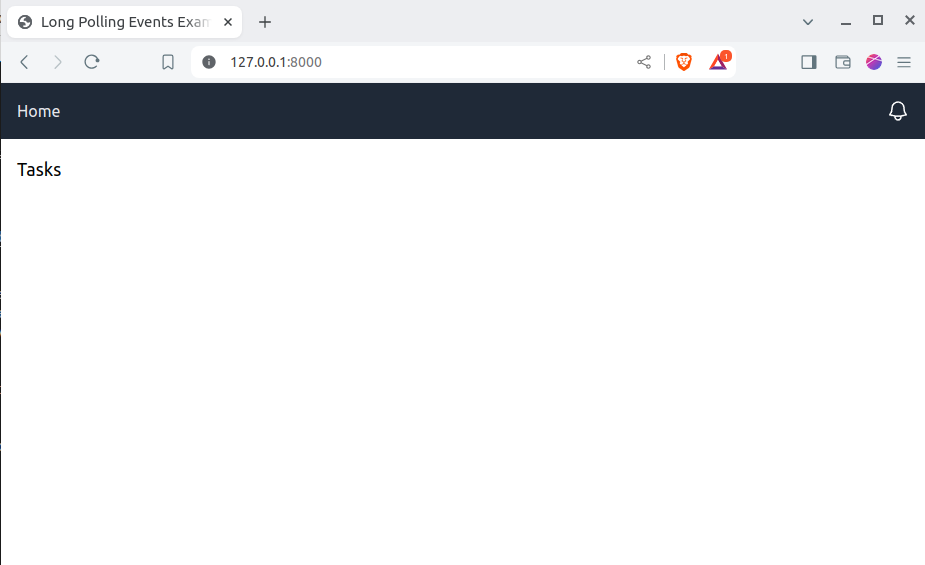
# Using docker-compose V2
docker compose up
which should give you something like this:
1. Event-Driven Django?
In order for real-time updates via SSE to work, we need two things:
-
The ability for Django to handle long-running HTTP requests
Traditionally, Django views run synchronously, and block the thread in which it is running in, which is not efficient for long running requests like SSE. Since version 3.1, Django has had the ability to use async views:
Django has support for writing asynchronous (“async”) views, along with an entirely async-enabled request stack if you are running under ASGI. Async views will still work under WSGI, but with performance penalties, and without the ability to have efficient long-running requests. Django Docs
So at a bare minimum, we need to use async views and run the django app as an ASGI application (more on this later).
-
The ability for Django to operate in an event-driven manner. Specifically, other parts of the django application need to be able to notify the SSE request handler/view that updated notifications are ready to be sent to the client.
This can be done in a few different ways, but at a bare minimum you need an external storage system to persist notifications and interact with the SSE handler in an asynchronous way.
We could roll our own solution, but Django Channels solves both of these issues for us:
-
Django channels extends support for Django’s native asynchronous views by permitting any protocol to be used, not just HTTP. This is not super useful for our use-case as we’re still planning on using HTTP, but we have the option to easily upgrade to Websockets in the future. But more importantly:
-
Django Channels has optional support for Channel Layers, which provides an interface for out-of-band (inter-process) communications between channels.
A channel is simply an ASGI application instance which exists for the duration of a scope. The scope is simply the lifetime of a request. For SSE - this lasts for the duration of the long-running request until the client or server terminates the connection.
Channel Layers are a specification which can be implemented using whatever storage backend you like. The most popular one is channels_redis which persists channel communications to redis.
2. Setup: Django Channels
Now let’s set up Django Channels!
-
Add required dependencies:
We obviously need
channelsandchannels_redis:poetry add channels channels_redisBut we also need a server which implements the ASGI specification, and allows Django to efficiently handle asynchronous requests. Channels uses Daphne by default, but I’m going to use Uvicorn because it’s lightweight and fast.
poetry add uvicorn -
Register your application as an ASGI app in
sse/asgi.py:import os from django.urls import path, re_path from channels.routing import ProtocolTypeRouter, URLRouter from channels.auth import AuthMiddlewareStack from django.core.asgi import get_asgi_application os.environ.setdefault("DJANGO_SETTINGS_MODULE", "sse.settings") # Initialize Django ASGI application early to ensure the AppRegistry # is populated before importing code that may import ORM models. django_asgi_app = get_asgi_application() application = ProtocolTypeRouter( { # Routes request based on protocol (i.e. http, websocket etc.) "http": AuthMiddlewareStack( # Middleware to authenticate a user and add their username to the request URLRouter( [ re_path("", django_asgi_app), ] ) # Routes request based on url ) } ) -
Configure settings file
sse/settings.pyto use channels:Add the following line to define the ASGI app:
ASGI_APPLICATION = "sse.asgi.application" -
Now we need to setup the channels layer.
We’ll use redis as the channels layer backend. Add the following lines to the end of
compose.yaml:... redis: image: redis:alpineand then configure Django to use the new redis server by adding the following lines to
sse/settings.py:CHANNEL_LAYERS = { "default": { "BACKEND": "channels_redis.core.RedisChannelLayer", "CONFIG": { "hosts": [("redis", 6379)], }, }, } -
Finally, we’ll update our django container to run our app using uvicorn. Our docker compose file now looks like this:
services:
web:
    image: sse
    build:
    context: .
    ports:
    - "8080:8000"
    volumes:
    - sse.sqlite3:/app/sse.sqlite3
    entrypoint: /app/entrypoint.sh
redis:
    image: redis:alpine
We’re also using an
entrypoint.shfile in the root directory with the following contents:#!/bin/bash set -e poetry run python manage.py makemigrations poetry run python manage.py migrate poetry run uvicorn --host 0.0.0.0 --port 8000 --reload --reload-include "sse/events/templates/*" sse.asgi:applicationThis starts the asgi app using uvicorn, and also reloads the app automatically on changes to python files (with
--reload) and templates (using--reload-include). Now when you rundocker compose upyou should see that django is running as an asgi application:... web-1 | INFO: Will watch for changes in these directories: ['/app'] web-1 | INFO: Uvicorn running on http://0.0.0.0:8000 (Press CTRL+C to quit) web-1 | INFO: Started reloader process [13] using WatchFiles web-1 | INFO: Started server process [17] web-1 | INFO: Waiting for application startup. web-1 | INFO: ASGI 'lifespan' protocol appears unsupported. web-1 | INFO: Application startup complete.
2. Server Side: Create a Django Channels SSE Consumer
A channels consumer is simply an abstraction which lets you easily create ASGI applications. An ASGI application just needs to implement the following interface:
async def application(scope, receive, send):
    pass
This is an asyncio coroutine which takes a scope containing details of the connection, and two callables - receive and send which control how the request is processed. Channels provides classes which implements the above interface for commonly seen consumers such as websockets (WebsocketConsumer) and asynchronous http (AsyncHttpConsumer).
We can extend AsyncHttpConsumer for SSE. Create a new file sse/events/consumers.py:
from channels.generic.http import AsyncHttpConsumer

class ServerSentEventsConsumer(AsyncHttpConsumer):
    async def handle(self, body):
        await self.send_headers(
            headers=[
                (b"Cache-Control", b"no-cache"),
                (
                    b"Content-Type",
                    b"text/event-stream",
                ),  # Indicates that the response is of type SSE
                (
                    b"Transfer-Encoding",
                    b"chunked",
                ),  # Indicates that data is to be sent in a series of chunks, and total size is unknown
                (b"Connection", b"keep-alive"),
            ]
        )
        # Headers are only sent after the first body event.
        # Set "more_body" to tell the interface server to not
        # finish the response yet:
        await self.send_body(b"", more_body=True)
The handle method handles the initial connection from the client. However, there is one thing we need to correct. The AsyncHttConsumer was designed to expect multiple pieces of data from a client so it waits for all the data, passes it to the handle method and disconnects the connection, as shown below:
class AsyncHttpConsumer(AsyncConsumer):
    ...
    async def http_request(self, message):
        """
        Async entrypoint - concatenates body fragments and hands off control
        to ``self.handle`` when the body has been completely received.
        """
        if "body" in message:
            self.body.append(message["body"])
        if not message.get("more_body"):
            try:
                await self.handle(b"".join(self.body))
            finally:
                await self.disconnect()
            raise StopConsumer()
(Source)
We need to change this behaviour so that the connection is held open indefinitely until the client chooses to disconnect, so we can override this method in our consumer class:
class ServerSentEventsConsumer(AsyncHttpConsumer):
    ...
    async def http_request(self, message):
        """
        Receives an SSE request and holds the connection open until the client chooses to disconnect.
        """
        try:
            await self.handle(b"".join(self.body))
        finally:
            pass
Now we need to create a function which sends the SSE data. SSE data needs to be in the following format:
event: <event_name>
data: <data>
\n
\n
Those two new lines at the end are important and indicate the end of the event message.
The
eventfield is optional, and can be left out. However, this does make the event ambiguous to the client, which may need an event name for specific handling.
In our case, we need to send two events simultaneously:
event: task_event
data: <rendered html of the new task>
\n
\ns
event: notification_event
data: <rendered html of the notification to display>
\n
\n
It’s somewhat important in this contrived example that the task_event event is sent first so that the updated task list can be displayed before the notification arrives. Let’s create a function in ServerSentEventsConsumer to send an event:
from django.template import render_to_string
from sse.events.models import Task
...
    def get_user_tasks(self):
        return [
            SerializedTask.to_obj(task)
            for task in Task.objects.filter(assigned_to=self.scope["user"])
        ]

    async def sse_event(self, event: dict):
        log.info("send event triggered")
        task = SerializedTask(**event["task"])
        # Send an updated list of all tasks
        tasks = await database_sync_to_async(self.get_user_tasks)()
        task_detail = ""
        for task_obj in tasks:
            task_detail += render_to_string("task.html", {"task": task_obj}).replace(
                "\n", ""
            )
        data = f"event: task_event\ndata: {task_detail}\n\n"
        await self.send_body(data.encode("utf-8"), more_body=True)

        # Send task notification event
        task_notification = render_to_string(
            "notification.html", {"task": task}
        ).replace("\n", "")
        data = f"event: notification_event\ndata: {task_notification}\n\n"
        await self.send_body(data.encode("utf-8"), more_body=True)
You might be wondering why we’re passing in a dict as the arg rather than the Task directly. Django Channels cannot use python objects when communicating with consumers. Instead we have to use json objects or strings. Let’s set up a simple serializer class which handles the conversion to and from a Django model class:
@dataclass
class SerializedTask:
    title: str
    description: str
    assigned_to: str
    created_by: str
    due_by: str

    @classmethod
    def to_obj(cls, task: Task):
        return cls(
            **{
                "title": task.title,
                "description": task.description,
                "assigned_to": task.assigned_to.username,
                "created_by": task.created_by.username,
                "due_by": task.due_by.strftime("%d/%M/%y %h:%m:%s"),
            }
        )

    @classmethod
    def to_dict(cls, task: Task) -> dict:
        return {
            "title": task.title,
            "description": task.description,
            "assigned_to": task.assigned_to.username,
            "created_by": task.created_by.username,
            "due_by": task.due_by.strftime("%d/%M/%y %h:%m:%s"),
        }
Now we need to setup a url endpoint for the client to call our consumer to receive events.
In our asgi.py file, we can add a new url route to our consumer:
...
django_asgi_app = get_asgi_application()

+# This must be imported after get_asgi_application to avoid django.setup() to be called more than once. See:
+https://channels.readthedocs.io/en/stable/topics/troubleshooting.html#improperlyconfigured-exception
+from sse.chat.consumers import ServerSentEventsConsumer

application = ProtocolTypeRouter(
    {
        "http": AuthMiddlewareStack(
            URLRouter(
                [
+                   path("sse/notifications", ServerSentEventsConsumer.as_asgi()),
                    re_path("", django_asgi_app),
                ]
            )
We also referred to two templates - task.html and notification.html. We already created the task.html partial in Step 0. Now we’ll create the notification.html partial which will be the same as task.html, but without a description:
<div
    class="block max-w-sm rounded-lg border border-gray-200 bg-white p-6 shadow dark:border-gray-700 dark:bg-gray-800 dark:hover:bg-gray-700">
    <h5 class="mb-2 text-2xl font-bold tracking-tight text-gray-900 dark:text-white">{{ task.title }}</h5>
    <ul class="font-normal text-gray-700 dark:text-gray-400">
        <li class="pb-2 font-bold text-blue-800">@{{ task.assigned_user.username }} <span
                class="text-black font-normal">
                by </span><span class="text-red-800">{{ task.due_by }}</span> </li>
        <li class="py-2">from <span class="text-green-800">@{{ task.created_by }}<span></li>
    </ul>
</div>
3. Server Side: Trigger Notification Events
We now have the ability to send events to the client. The next step is to trigger these events when a new Task is created. When Django Channels is used with Channel Layers, consumers generate a unique channel name for each persistent connection (scope). We can use this to uniquely identify our user’s connection(s), and send them the right information at the right time.
However, users may login from multiple browsers or have many tabs open, and we want to be able to send notifications to all locations. For this, Channels has Groups. Groups is a broadcast system which associates channels together so that messages can be sent to multiple channels at once.
Let’s modify our ServerSentEventsConsumer to add the channel to a group when a new SSE connection is started:
from datetime import datetime
from channels.generic.http import AsyncHttpConsumer

class ServerSentEventsConsumer(AsyncHttpConsumer):
    async def handle(self, body):
+       await self.channel_layer.group_add(f"sse_{self.scope['user']}", self.channel_name)
        await self.send_headers(
            headers=[
                (b"Cache-Control", b"no-cache"),
Back in Step 2, we added a AuthMiddlewareStack to our ProtocolRouter in our settings. This authenticates the user and adds their username to self.scope["user"], which we make use of above to create a username specific group.
We’re also going to create a disconnect method to remove the channel from the group when the connection closes:
    async def disconnect(self):
        await self.channel_layer.group_discard(f"sse_{self.scope['user']}", self.channel_name)
We’re going to create a Django Signal in sse/events/signals.py which listens for the creation of new Tasks and updates to existing tasks, and calls the channels layer group associated with the assigned user:
from django.db.models.signals import post_save
from django.dispatch import receiver
from asgiref.sync import async_to_sync
from channels.layers import get_channel_layer
from sse.events.models import Task
from sse.events.consumers import SerializedTask


@receiver(post_save, sender=Task)
def task_event_handler(sender, instance, created, **kwargs):
    channel_layer = get_channel_layer()
    username = instance.assigned_to.username
    task = SerializedTask.to_dict(instance)

    async_to_sync(channel_layer.group_send)(
        f"sse_{username}",
        {"type": "sse.event", "task": task},
    )
There are two important things to note here:
-
We’re using the group name of the user who the task was assigned to. If the user is not logged in, the group won’t exist and they won’t receive a message. If you want a persistent notification system, you’ll have to persist the notification data to the database and send the user a list of unread notifications when they next login.
-
The
sse.eventtype is important. This is what channels uses to find the callback method - in our caseasync def sse_eventin ourServerSentEventsConsumer.
4. Client Side: Listen for Notifications
Now we’re finally ready to move to the client-side. We need to:
- Establish a SSE connection to the
/sse/notificationsendpoint - Listen for notification events and render them
First up, we need the Server Sent Events HTMX Extension. Let’s add that to our home.html template:
<head>
    <meta charset="UTF-8">
    <meta name="viewport" content="width=device-width, initial-scale=1.0">
    <title>Server Sent Events Example App</title>
    <script src="https://cdn.tailwindcss.com"></script>
+   <script src="https://unpkg.com/htmx.org@1.9.12/dist/ext/sse.js"></script>
</head>
The SSE HTMX extension has the ability for a single SSE connection to listen and swap the contents of different child elements based on the event. We’ll setup section as our sse parent element which triggers the sse call (using hx-ext and sse-connect). Then we’ll swap the contents of two child elements:
- The task contents based on the
task_eventdata - The notification details based on the
notification_eventdata
         </li>
     </nav>
     <h1 class="m-4 text-bold text-lg">Tasks</h1>
-    <section>
+    <section hx-ext="sse" sse-connect="/sse/notifications">
         <!--This is where we will display our tasks-->
-        <div class="grid grid-cols-1 md:grid-cols-4 m-4 p-4 gap-2 text-wrap">
+        <div sse-swap="task_event" hx-swap="innerHTML" class="grid grid-cols-1 md:grid-cols-4 m-4 p-4 gap-2 text-wrap">
             {% for task in tasks %}
             {% with task as task %}
             {% include 'task.html' %}
             {% endwith %}
             {% endfor %}
         </div>
-        <div id="notification"
+        <div sse-swap="notification_event" hx-swap="innerHTML" id="notification"
             class="hidden fixed m-4 min-w-64 ms-32 bg-gray-200 text-gray-800 text-center rounded-sm p-4 z-1 bottom-0 right-0 text-wrap">
         </div>
     </section>
Now stand back and watch the magic happen:
PS: If you wanted more flexibility in how sse events are handled, you could listen for the sse:task_event and sse:notification_event events to write your own javascript event handler.
This was a fairly long post, but hopefully you got something useful out of it! Complete code can be found here.